Materials | Inspiration| Gallery

Bodice Pattern:
Using the Past Patterns' 1860's darted bodice pattern I had to make a few changes. I took the bodice front pieces and back piece, and shortened them so that they were slightly above my natural waistline. I wanted to add a waistband, so I also removed the width of the waistband from the bodice, except for leaving 1/2" for seam allowance. I made the waistband 1 1/2" wide plus 1" for seam allowances. Since the opening on the 1860's bodice pattern is in the front, I wanted to move it to the back, so I found the center front line on the bodice front and cut it off. I then measured how wide it was from the center front, to the edge of the bodice front and added that measurement to the back piece at center back. Remember when you do this, to mark "cut on fold" on the front pattern piece. On my pattern, the back pattern piece is one piece. You could either make a false four piece back (which is what I did) or you could make a true four piece back. A false four piece back is one pattern piece. On the pattern, there is a curved line from armscye to waist. This line will be tucked and top stitched on each side of the back. A true four piece back has four pieces, the side/back piece and the back piece. You would sew together the side/back piece and the back piece together. Of course you wouldn't sew the center back seams together, because that is your opening. You can also top stitch the curved seam if you like, but you do not have to. I personally think it adds a neat touch to the garment, even though it's barely noticeable.
The lining will be darted and the outside fabric will be gathered over the darts. I wanted to add some boning in the darts, but I only had two bones, so I decided to change the four darts to two darts. (I didn't want to have to wait to order more boning.)
I cut out the front bodice piece and pinned it to my dress form so I could draw the lower neckline. I also cut off some of the shoulder. On 1860's bodices, there is a dropped shoulder seam. I noticed on many of the original 1830's dresses, that they did not have as much, or any, of a dropped seam.
In this picture you can see I cut a slit through the darts. I will explain more about that later.
)
After drawing the neckline on the dress form, I took the pattern off of the form and put it on the table. I then overlapped it 1/2" over the bodice back piece at the shoulder seam. Then I marked the back piece's neckline and shoulder seam.
)
Since I wanted to make a gathered bodice, I had to add more fullness to the bodice front pattern. The darts usually don't have enough fabric to make a nice amount of gathers. That is up to the individual, though. To add more fullness, all you have to do is make a slit in the pattern where the darts are. I would recommend you copy your darted bodice pattern so that the pattern with the darts will be the lining, and the pattern with the extra fabric can be gathered for the top bodice layer. I ended up just making the darts bigger, so that I wouldn't have to trace another pattern out. I know, lazy me. But, if you intend on keeping both darts for the lining, I think it would be a lot more simpler to just trace out another bodice pattern. I should have, but I didn't. Make the slit almost all the way to the top of the neckline, but make sure you stop at the neckline, not after.
)
Spread the slit out to make the bodice slightly bigger. Take a piece of paper and tape it under the slit to keep it in place. Since I decided not to trace an extra bodice pattern for the lining, I just made the dart bigger and a little longer. Again, I should have just traced out an extra pattern for the lining.
)
Now I have my pattern pieces to where I think they will work. I used some scrap muslin to make up a mock bodice. I ended up making two mock bodices, because I didn't like how low the neckline was. The picture below shows the second mock bodice. You may also notice a pencil line a little above the waistline. I wanted the waist to be a little higher, so I marked it up just a bit.
)
Enlarging the gigot sleeve pattern:
I used Janet Arnold's Patterns of Fashion 1 to make the large gigot sleeves. I didn't have any grid paper, so I marked 1" squares on a large piece of paper. I then slowly hand copied the pattern onto the grid paper.
)
Here is the finished sleeve pattern. Don't forget to add 1/2" to the outside for the seam allowance. I was lucky, because the sleeve fit me perfectly. You may have to alter it to fit the size of your arm, though. Since these patterns are taken from originals, there are many different sizes for each pattern in the book. This pattern would be very easy to enlarge or size down. You would just add or subtract from the narrow part of the pattern. Doesn't this pattern look like a tree?
)
Bodice Construction:
Cut out your lining and fabric pieces. Mark the darts, fold lines, and curved seam in the back if you are doing a false three piece back. Baste together the back bodice lining piece and the back fashion fabric piece together. (The fashion fabric is the fabric that will be seen on the outside.) If you are doing a false three piece back, baste over the top of the curved line. I will explain how to make a tucked seam later on.
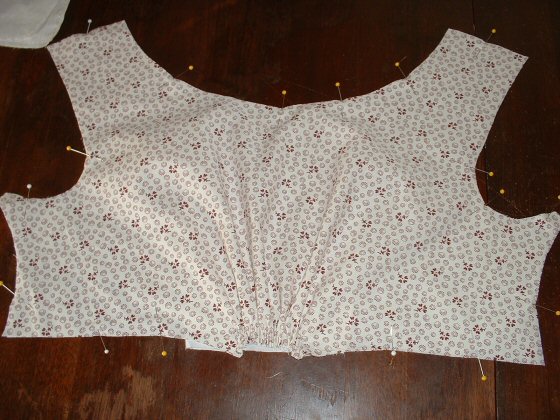
On your front lining piece, sew the darts together. On the front fashion fabric piece, sew two lines of gathering stitches. Usually this is in between where the darts would have been placed. I made the gathering stitches by hand.
If you are going to add boning to the darts, now is the time to sew them in.
Now draw the gathers in over the darted lining piece. Pin gathered bodice over darted bodice and baste together.
)
)
To tuck the back of the false three piece back is very simple. Make a crease with your iron where the basted curved line is. Once you have that crease, you can remove the basting stitches. It should look like this:
)
Now iron the crease down towards the center back,
)
and top stitch in place. I decided I would sew this by hand. Gowns from this era would have been sewn by hand, but I didn't want to have to sew the whole gown all by hand, so I did any seems that could be seen, by hand. Note: there are also several other places that need to be done by hand that aren't seen on the outside. But I didn't want to have to sew the majority of the dress by hand. Someday I do plan on making a whole dress by hand, though.
)
Sew bodice front and backs together. Press seams towards back.
Click here to continue to page 2 of this journal.