
Making Mid 19th Century Shoes
by Anna Allen
July 3, 2005
Some people might call me crazy. Other people might call me...well...I don't know. But whatever anyone may think about this seemingly impossible scheme of mine, I am going to attempt to learn how to make 1860's footwear. I have always longed to have a pair of blue silk side lacing boots with foxing at the toe and heel, but I have not found anyone who makes these. Well, I take that back. There are a few people who might make this for me, but I don't really want to spend $140 for them. I do have a pair of Robert Land's wonderful side laced wool boots and they're great, but I can't afford another pair. Not to mention I've always wanted to make a pair of silk dancing slippers or embroider a pair of slippers. So far no one makes embroidered slippers and if they did, the price would most definitely be outrageous and rightly so. I'm sure the task of making shoes is not an easy one. But, as I am a do-it-yourself kind of gal, I thought I might take up this task myself. I tried making myself a pair of slippers one time, although that bombed. I thought it had discouraged me from ever attempting shoe making again, but it didn't. That's either a good thing or a really, really bad thing. I'm sure I will find out soon enough. Although, back when I tried making my own slippers, I definitely did not have all of the materials, nor did I have the right materials. This time around I'm doing more research and taking my time to get all the appropriate materials needed before attempting this project. The number one item I feel that I need is a period shaped last(s). So, at the moment I'm trying to find two lasts (right and a left last) that will fit my size feet. I tend to have rather middling sized feet, I guess you'd say, so it's not terribly easy to come up with a pair of lasts that will fit. I usually wear an 8 1/2 and while that's not huge, it's not really a period size either. So far I have a few options on eBay. One is a pair of men's lasts that look to be my size. These will need to have heels on them, which is fine. But for my first pair that might be a little difficult to master making an actual shoe AND a heel. But, we'll see. Not to mention it's kind of weird it's a man's last, but it looks very similar to a women's shoe of the period and so this might just be my best bet. I also came upon an earlier shoe last that I found first and quickly purchased for $20. That was probably a mistake and I shouldn't have rushed to get it. I will probably put it to some use, I'm sure. There's another last I found on eBay that is a straight last. I'm not sure how comfy that would be to wear, but it is period and the patterns I have in the book Every Lady her own Shoemaker would actually fit this last the best as it's neither a right or left foot pattern. And then there's another last on eBay which would also fit my feet perfectly, but the problem is that it's missing the other last and I'm already stuck with an early 19th century last which is also missing the other last. Suffice it to say that I have many last options and I hope to end up with a working pair of lasts soon without spending an arm and a leg on several last purchases. Wow. That was a mouth full!
I really hope I don't spend too much on this project and then end up not being able to make my own shoes. That would royally stink. I made a list of tools that I need or at least I think I need. I'll probably be adding to it when I learn more about shoemaking and what one needs.
Tools & other Materials:
Every Lady her own Shoemaker (This is a MUST!) (I was able to purchase mine through http://www.osv.org but I'm not sure if they still carry it.)
A pair of 19th century shaped (square toe) shoe lasts (eBay)
One awl (Try to get one that is curved, but I was able to use the one I had which is just a regular straight awl you can find at a fabric store.)
Curved needles (Try not to get ones too thick or it will be hard to thread through the holes and you'll also need at least two in case one breaks.)
Linen thread (I actually used the linen thread that came with my coverlet kit from FFC and it worked perfectly!)
Shoemakers' wax (I just used beeswax and ironed the thread after waxing.) (I read somewhere that linen pre-waxed thread works and is about $5 at Greenberg & Hammer)
Black kidskin leather (2 oz) for uppers and/or foxing
Saddle skirting (10 oz thick) for soles (Look for scraps at leather places or sometimes eBay sells scraps, which is where I am getting mine. It's better to pay $30 for several large pieces of leather that will work for several shoes than a whole hide for $100-$200.)
For the heel stiffeners I just used a leather that was about half as thick as the saddle skirting. I had some leather on hand that I used, but I'm sure anything with moderate stiffness would work. I'm not exactly sure what was actually used for the heel stiffeners, so you may find something better than this!
Silk for uppers
Cotton duck or cotton canvas to line the silk
1/2" wide ribbon or braid to bind the uppers. In Every Lady they call for silk "galloon," which may be acquired perhaps at an antique shop or you might check eBay. I haven't been able to find anything like this today so I would suggest using silk ribbon as an alternative. You may be able to get away with wool braid or twill tape.
Silk or cotton cord or narrow silk ribbon to lace up the shoes (I'm still looking for a place that sells narrow shoelaces that look like the laces I've seen on period shoes. So far no luck.)
Website Links:
Discussion on the Civil War Reenactors Forum (Someone started a discussion on making shoes and this is what initially got me back into the desire to make shoes again.)
A Beginner's Addendum to Making Shoes (I think this is geared more towards Medieval era shoes, but there are a lot of great tips on shoemaking in general.)
19th Century Leather Definitions (Very self-explanatory, I think.)
The History of Shoes: Shoe Making (I haven't gotten to read all of this yet, only skimmed through it, but it looks very interesting.)
History of Shoes - 19th Century (Some great pictures of original shoes from the 19th century.)
Update 5/4/2007: This website has taken me awhile to put together. In fact, I have put off doing anything with it for two years. I intend to put together a guide to help those who are brave enough to attempt making their own shoes or slippers. Unfortunately, I don't have a lot of time to spend working on this site at the moment, but I will try very hard to be better at adding to the site. Right now I'll just add pictures so you at least have a visual guide. Eventually I'd like to write up better instructions. But for now, if you seriously would like to make a pair of shoes, the two things you need above anything else is the book Every Lady Her Own Shoemaker and if at all possible, get a hold of an original pair of shoes. At least look at as many pictures of original shoes as you can. I was fortunate to be able to borrow several pairs from K. Krewer to study before beginning this project, which was a GREAT help. I also took several pictures of them and will try to upload those as well. I would like to make a pair of slippers sometime, but at the moment I have a pair of shoes that I told someone I'd make for them, which is long overdue! So if I get any time at all, those will be on my list first and next a pair of slippers!

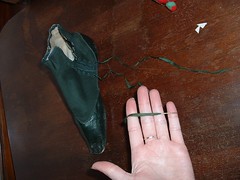
I guess I never took pictures of my last, except for the bottom. I'll try to remember to get a better picture up of my last sometime. Btw, I ended up using the straight last I purchased on eBay. Next pair I make I may try to do a pair of lefts and rights and see how that works.
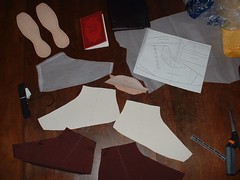
This shows the uppers cut out for one shoe. I accidentally marked both pieces of the silk uppers and sewed them together, as you can see in the next photo. I just erased the chalk marks on one side.
Don't make the same mistake I did and mark both sides! You only want one opening, not two!!
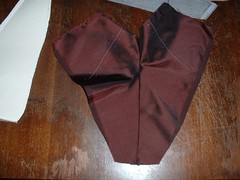
Attach the heel stiffener to the canvas shoe lining before joining it to the silk uppers.
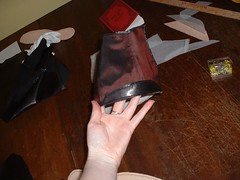
Leather foxing attached to the shoe. Actually, the originals I've seen have the fabric piece covering the leather foxing. It's hard to explain here and I'll try to do a better job of at it when I write out better instructions, but basically you would cut the silk uppers in the shape you wanted your foxing plus add on 1/4" or enough to turn under. Then you would top stitch the silk over the leather foxing. I know it doesn't make much sense, but I will show pictures of an original when I get time so you can understand what I'm getting at. ;-) The way I did it was that I cut the leather foxing and place that over the silk uppers instead of placing the leather under the silk uppers. I know, clear as mud!
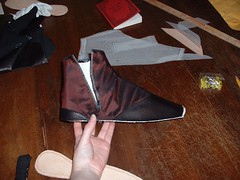
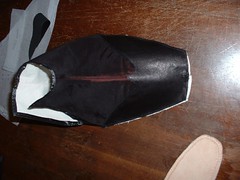
One shoe "upper" complete.
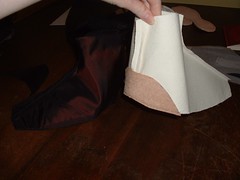
Heel foxing.
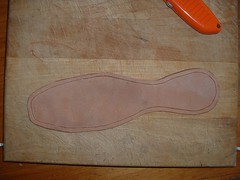
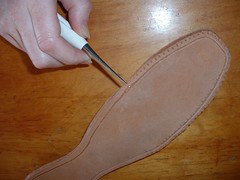
Leather sole cut in the shape using the patterns in Every Lady Her Own Shoemaker as a guide. The cut that is made was done on an angle. Be careful not to cut all the way through the leather!
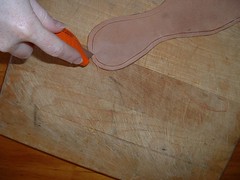
I made another cut around the shoe to remove some of the excess leather to make a slight rivet.
Use your awl to create holes for sewing the uppers to the soles. With this method, you will not see the stitching lines on the bottom of the sole. I'm not positive this is the actual way a shoe was attached in the period, but after studying several originals, reading and re-reading Every Lady, I figured out this may have been what was done for a "turned shoe" of the period. At least it worked pretty well for me!
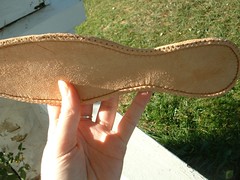
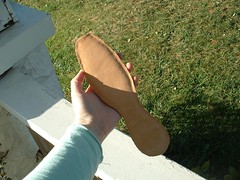
Completed sole. Now it will need to be soaked for a few minutes before attaching it to the silk uppers.
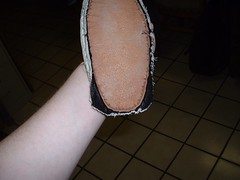
Under side of the sole.
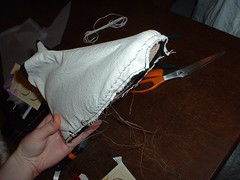
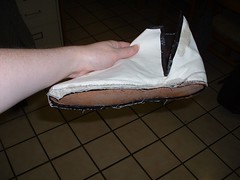
Attaching the uppers to the sole using a shoe last and waxed linen thread.

I believe I was able to get away with using a straight needle for part of the time. The curved needles I had seemed to be too thick, but they are a lot easier to use if you can get the right size.
Finished sewing the upper to the sole!
You may have to trim any excess material.
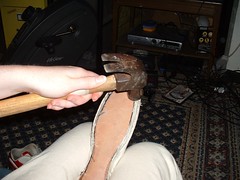
Using a hammer, I banged down the edges. Works well if it's slightly damp.
I don't have a picture for turning the sole, but it's actually not as hard as it sounds. Just be sure you soak the leather soles with water before you attempt this. It makes all the difference. I just took a wet washcloth and let it soak on top of the sole for a few minutes. Be careful not to get the uppers wet while soaking. You probably won't be able to totally avoid this, but be careful because some silk can stain. Be sure to keep working on turning your shoe until it's completely turned. It will take a few minutes, but keep at it!
Once the shoe has been turned, put it back into your shoe last and let it dry over night. The sole will take on the shape of the last.
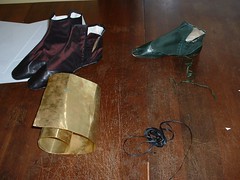
Most of the original shoes I saw had some type of copper tip (not totally sure what it was made out of) on the ends of the lacing. So what I did was take a piece of copper sheeting that I had acquired years ago at an art supply store to use for my lacing tips.
Here is what the lacing looks like on an original shoe from K. Krewer's collection.
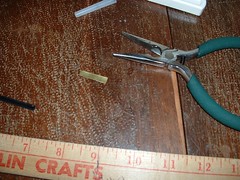
Here is the piece I cut out to bind the ends of the silk ribbon I used for my lacing.

Every Lady Her Own Shoemaker suggests blacking the edges of your shoes with black ink. Be careful not to stain the uppers with the black ink.

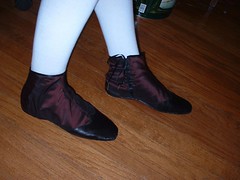
My first completed pair of shoes!